I have been experimenting with using WooCommerce to set up a site to collect donations, on both a one-time and recurring basis.
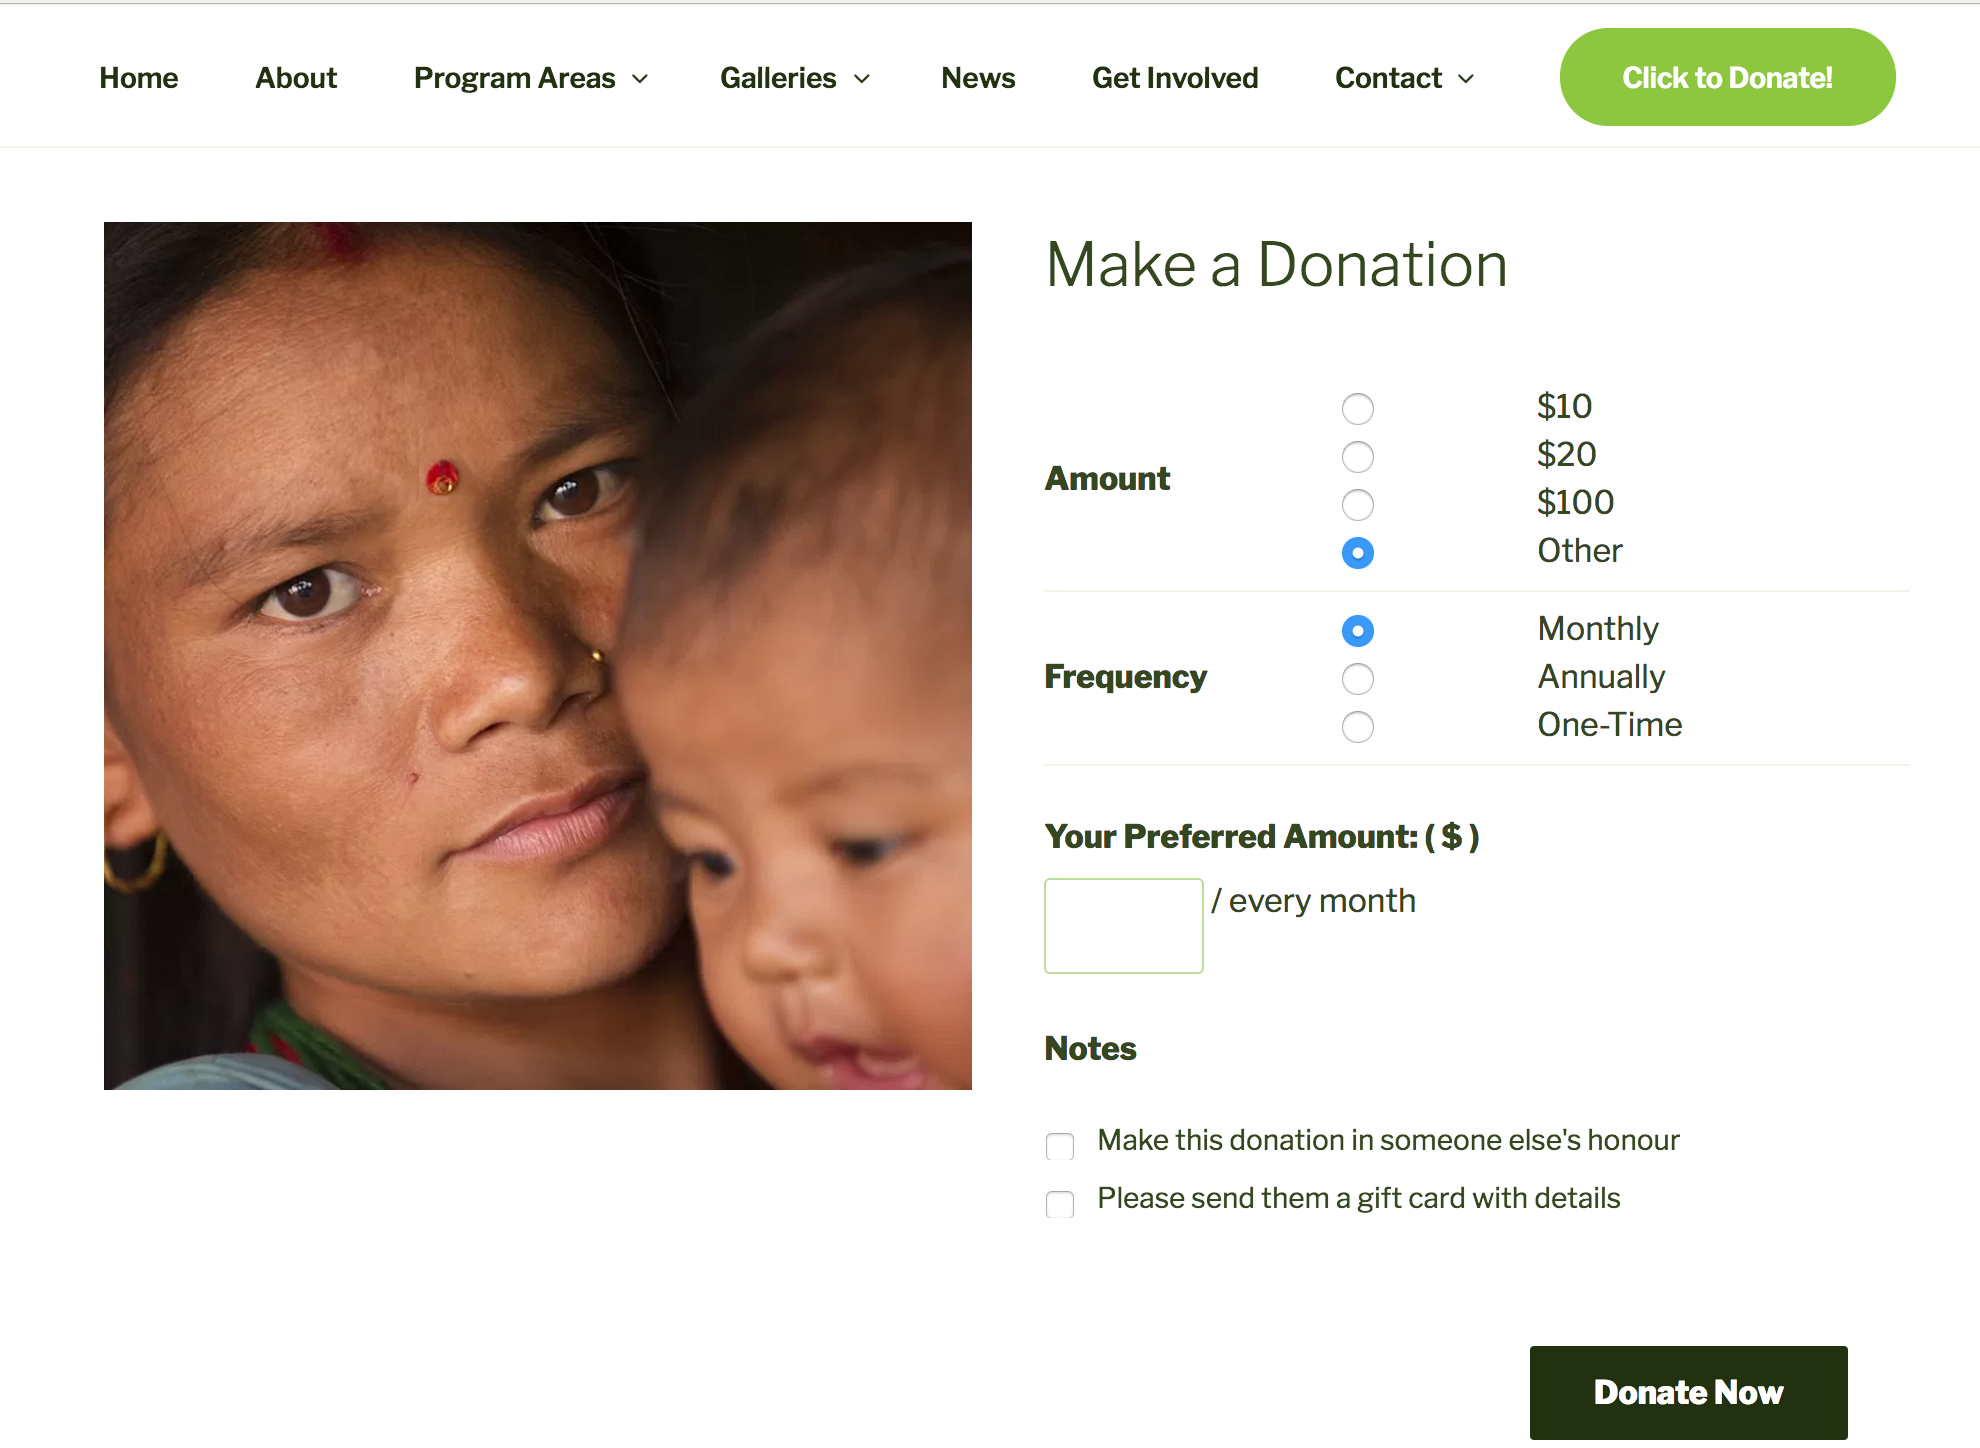
Here is a screenshot of the finished product work in progress:
I’ve set this up with a number of WooCommerce’s paid extensions. I’ll start with the essentials, then tell you about the optional bits.
Essentials:
- A website built with the WordPress.org Open Source Software
- WooCommerce
- WooCommerce Subscriptions & a compatible gateway (I used Stripe)
- WooCommerce Name Your Price
- WooCommerce Variation Swatches and Photos
Step One: The Basics
Step one is to have your WordPress site set up, and install WooCommerce, as well as the other plugins I listed above.
Step Two: Subscriptions Settings
In your site admin area, visit your WooCommerce > Settings > Subscriptions. You can set most of this up to suit your preference, but I made three specific changes:
I changed both the Add to Cart button text and the Place Order button text to Donate Now.
Also, I set it to Allow Switching Between Subscription Variations. This means that our donors will be able to log into their account anytime, and increase or decrease the amount of their ongoing donations.
Step Three: Product Setup
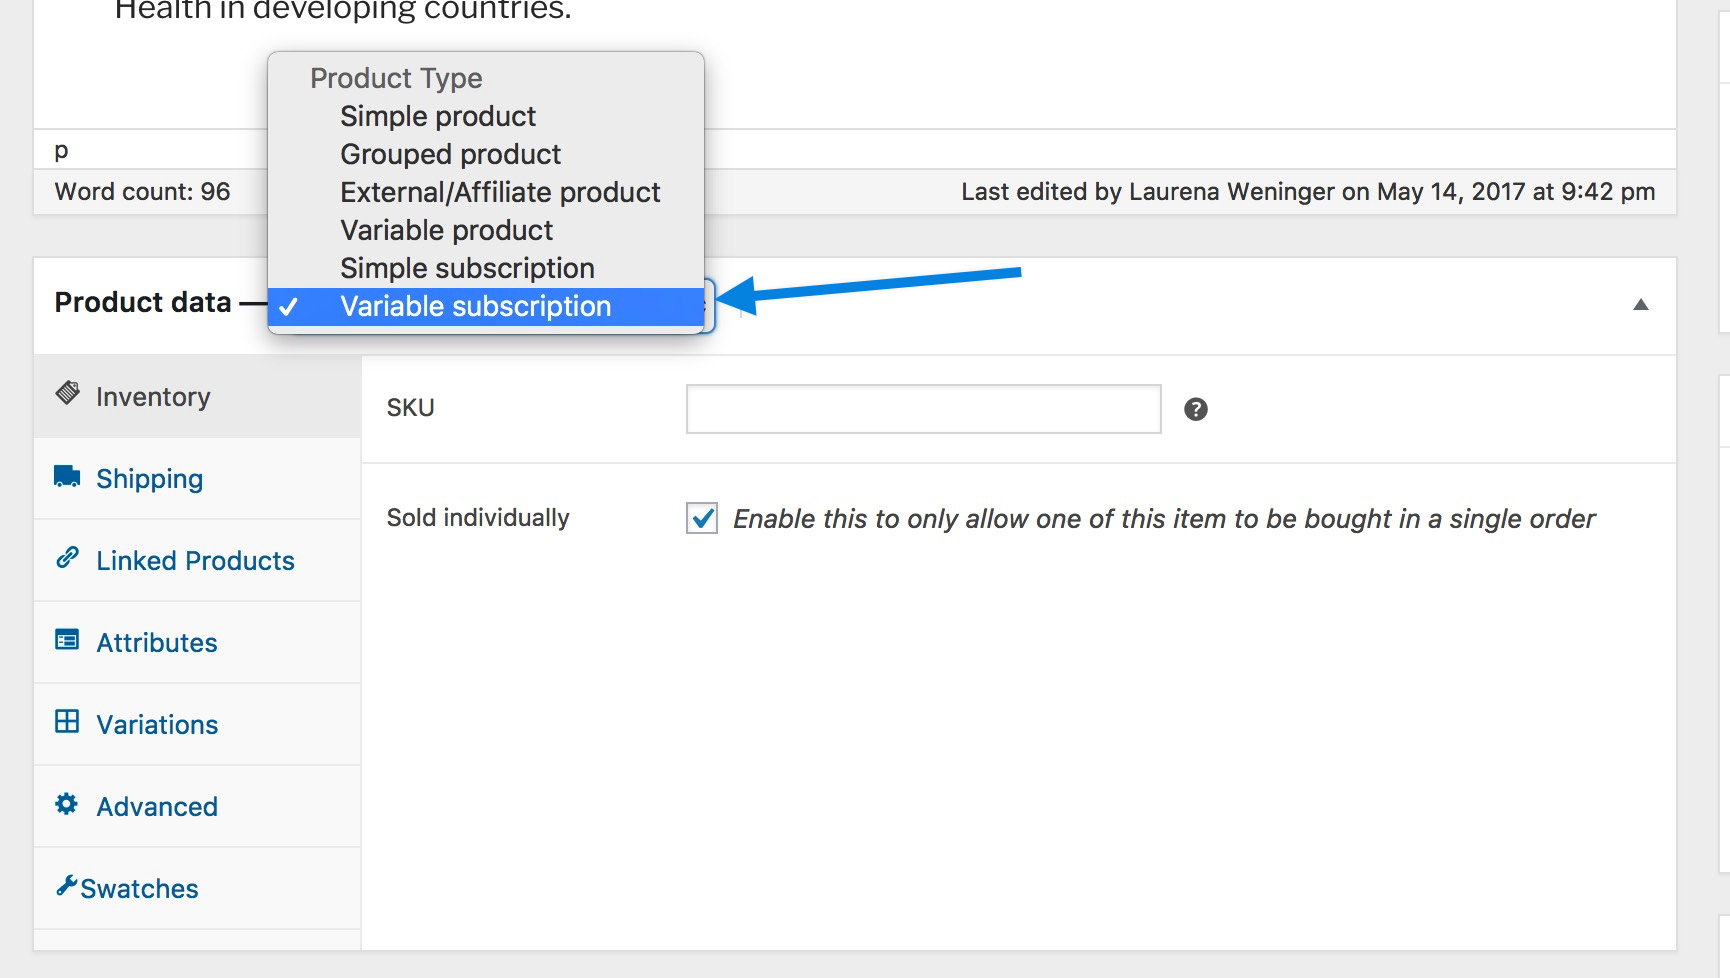
Set up the donation product as a Variable Subscription. You will do this in your site admin, Products > Add Product.
You will choose Variable Subscription from the Product Type dropdown.
Step Four: Attributes
Add Attributes, for “Amount” and “Frequency.” Be sure to check “Used for variations.”

Step Five: Variations
Set up the variations. I set up for four amounts: $10, $20, $100, or name your price, on a one-time, monthly, or annual basis.

At this point, you will have to toggle open each of these Variations, and configure the details. For example, for the $20 Monthly Variation:

And for the Name Your Price Option:

The one-off donations are a little more tricky! For these, you are going to set up a subscription for every day, but with a subscription length of only 1 day. We tweak this a bit later in the process, so hang in there if this doesn’t sound quite right, so far.

Lastly, I visited the Swatches tab, and set the attributes to both display as Radio Buttons:

Step Six: Tweaking!
Now, after you have worked your way through and configured each and every one of the Variations, we are getting closer to the finished product. But there are some bits, which I have outlined in blue below, that still aren’t quite right:

I removed the From: $10.00 by adding this custom snippet to my child theme’s function.php:
https://gist.github.com/LaurenaRehbein/43c4ba0d484b6e8f01baf660a63c3a1e
Then, I changed the goofy wording of “every day for 1 day” with a pair of snippets. This targeted the “every day for 1 day” but also awkward wording that turned up with the other options.
https://gist.github.com/LaurenaRehbein/f45fa5b908b1bdaabeab6947b76d547a
I also used Loco Translate to change a string of text in WooCommerce Subscriptions, from First renewal: %s to Next: %s, so it looked a bit cleaner in the cart and at checkout.
Additionally, since we don’t sell any other items on this site, I didn’t use a shop page, and I redirected all shop links to the single product page, with this filter:
https://gist.github.com/LaurenaRehbein/8b371cb339b0fc46fd9d3d162e286de7
More steps:
From here, you are pretty much good to go. You will need to setup and configure your compatible payment gateway, and of course, test the system to make sure it is working as you like.
Stripe has a very easy way to set up test credentials, meaning you can do as many transactions as you like, before turning this loose on your donors.
Optional:
There are a few extra things I did here. I used Gravity Forms, and WooCommerce Gravity Forms Add Ons to set up that Note on the product, to allow the donor to purchase it in someone else’s honour, and arrange a gift card.
I also used WooCommerce PDF Invoices, and customized the template, to automatically attach a charitable tax receipt to each Order Completed email.
WooCommerce Order Status Control brings it all together, fully automating the system, by moving the order Status to Complete upon successful payment (triggering the receipt email).
Future Plans:
This isn’t yet a perfect solution – there’s room for improvement and further cusotmization. For example, the Thank You page for a one-time donation still refers to “your subscription”, and so does the email. Next step: customize that!


This … is amazing!
Thank you, I’m going to implement this on a non-profit site I’m helping someone with. Figured there was a nice WooCommerce way to do it. Thanks for outlining everything like this!
It also inspires me to write up some of the tricky things I do with WooCommerce for other people to learn from. (Side bonus is that it’s also nice for myself when I’m delving into code after a year or more to figure out just what in the hell I was doing!)
Cheers!
Hi John,
Happy this helped!
And happy to hear you are considering documenting your ideas more often. I’ve learned so much over the years from others, and that “giving back” is one of my favourite parts of the WordPress community.
Cheers!
Greetings from Turkey!
Ever since PayPal is no longer working in Turkey, there’s a limitation of payment processors that can be used in this country. We have identified one that is compatible with WooCommerce, but nothing else that doesn’t require a developer that doesn’t cost a fortune for a small organization like us!
I’ll be using this (minus subscription for now) as a workaround to meet our needs.
Lynda
Hi Lynda!
Sorry to hear there’s nothing compatible!
You could set up Subscriptions but manual renewal – but the donor would have to visit to make payment each time. Not the best solution, for sure!
Cool thank you!
Did you get the emails tweaked?
I did! Not a whole bunch, but a bit. And I added a PDF attachment to the email to serve as an official tax receipt.
Thanks so much for publishing this article. We are in the process of moving our website to Woocommerce for donations. Your article saved me hours and hours of research and trial and error.
Hey, thank you so much for letting me know! Happy to hear that.
How did you get the Name Your Price field to appear before the Gravity forms fields? When I add the Gravity Form to the product, the Name Your Price field appears below the Gravity Form.
Also, did you have to add a total field to your Gravity Form? It seems to be required to have the total appear on the Woocommerce product page.
Thank you for any help you can provide.
Hi Cecil,
Sorry about the delay here, I just noticed your question and hopefully you have already figured out the answer!
My product is set up as a Variable Subscription, and I ticked the Name Your Price for the actual variation. I didn’t change the display at all – the position is default to the theme I am using.
However, I do see the field is displaying under the form – but my form is conditional, and only opens if one of the tick boxes is checked. Maybe that is the difference?
And I did have to add a Product field to the form ($0 value). Screenshot: http://cld.wthms.co/PaRNzq
These were the settings I used in the Gravity Forms section of the product: http://cld.wthms.co/bSxNkH
Hope that helps!
It seems it appears in different places in different themes. I was able to get support from the theme developer for the functions/filters to add to my functions.php file to move it to the correct spot on the Woocommerce single product template.
Happy to hear that worked out! If/when you are live with it, drop me a link, I’d love to check it out!
Hello,
We have a wordpress/woocommerce site. I want to donate a portion of ours sales to charity, and let the buyer choose the charity from a list at checkout that I (as the seller) would provide. The extension could calculate the amount (based on a percentage that I designate, ie 3%) of donation. Or like Amazon Smile, they pick their charity and then shop and 3% is donated to their choice of charity. Do you know of any plugins and/or extensions we can use to make this happen?
I appreciate your assistance.
Thank you,
Wendy
Hi Wendy,
What a great idea! Something like WooCommerce Checkout Addons could handle this – it now handles percentage-based addons.
https://woocommerce.com/products/woocommerce-checkout-add-ons/
Other than that, I am not personally familiar with any other way to make this work. It would be awesome if you can update us here if you do find a good solution?
Best,
Laurena
Hello Laurena,
Thank you for your reply. We are not wanting to add 3% to the order, but to give 3% of the order to charity. It would be the company donating, not our customer, similar to how Amazon Smile works. We have not been able to locate anything that does this so far. I would think it would be a popular way to support charities.
I appreciate your assistance.
Thank you,
Wendy
Laurena, you’re our hero, this was the exact tutorial we needed and saves hours of work, thank you from the https://creeklands.org team!
If you need a positive review on any business listings or social media let me know.
Thank you, thank you!
Hi Rob! Happy to hear this was helpful! Good luck with your site – I recently attended a small workshop on Wetlands and learned so many interesting things! You are doing important work.
What an incredibly helpful tutorial. Thank you so much for taking the time to put this together.
Like you, I need to add some additional options to my giving form — the ability to give in honor/in memory of, the ability to specify a matching gift company, the ability to make the donation anonymous, the ability to apply the gift to either Fund A or Fund B, etc. Would you recommend doing all that through Gravity Forms, or through WooCommerce’s Add-Ons? I thought I was going to have to go through Add-Ons, but it looks as if GF might be a more robust way to go.
Again, many thanks!
I’m happy to hear it helped!
Product Add Ons will work well for this, too. But I like Gravity Forms Product Add Ons, which works with Gravity Forms for one specific reason: It offers the ability to make fields conditional. In other words, you can have your customer tick an option, which will then open up other options. I personally feel that is more professional than setting out all possible fields in advance.
One last thing – there is a new Woo extension out that is a lovely alternative: All Products for WooCommerce Subscriptions. It’s worth a look!
* https://woocommerce.com/products/all-products-for-woocommerce-subscriptions/?aff=10486&cid=1131038